Showing posts with label Breads. Show all posts

Tuesday, February 6, 2018

Protein-Packed Cheesy Zucchini Cornbread Waffles

We have always been a pancake family. The kids love them, and so do I because there are so many variations that I can do with them! Recently, waffles were introduced to the kids. They looked at me like I had robbed them of their youth! Since we have always had pancakes, it never occured to me to have waffles ... plus, I didn't have a waffle maker.

Now that my kids were waffle addicts, a waffle maker was amazingly gifted to me and everything in the universe was right. We were having waffles on one of the pancake days and the kids were more than happy (except for one kid ... there always has to be one). Then another lightning bolt came down on the kids ... "breakfast for dinner".

"Is that true mom, can we really have breakfast for dinner?!?!"


Protein-Packed Cheesy Zucchini Cornbread Waffles

But, this is where I draw the line a burst a bubble in their little lives. We were going to have waffles, but no syrup. I can't believe how much complaining I heard! Sorry kids, but your mom doesn't have a sweet tooth. I like salt and cheese!

Once the waffles were all done, their tune quickly changed and everyone loved them (again, except for one kid ... there always has to be one)! Breakfast for dinner is now happens quite often around here, one of these days I may give in and give them their chocolate chip waffles with syrup for dinner ...maybe!

You can easily make these totally vegan, dairy-free or mix and match according to what you like!


Protein-Packed Cheesy Zucchini Cornbread Waffles

Protein-Packed Cheesy Zucchini Cornbread Waffles

Made 6 waffles

1/4 c organic refined coconut oil
3 eggs (or egg replacer)
2 c almond milk or milk of your choice
1 c shredded cheese (I used almond cheese)
1 c shredded zucchini, squeezed
2 c whole wheat flour
1 c toasted walnut crumbs
3/4 c fine cornmeal
1/4 c hemp seeds
1/4 c nutritional yeast (optional)
4 t baking powder
1.5 t salt

In a bowl, whisk together coconut oil, eggs and milk.

Add in remaining ingredients and mix until all ingredients are well incorporated.

Spray your waffle maker and add batter according to your waffle maker's instructions.

I topped mine with a little extra cheese right before serving, so it slightly melted.


Protein-Packed Cheesy Zucchini Cornbread Waffles

Protein-Packed Cheesy Zucchini Cornbread Waffles

Friday, April 8, 2016

Garlic Scapes and Chive Flower Pull-Apart Bread

Spring is here ... so they say!

It may be April, but we are still getting light snow a couple days a week and then a mix or 50º-60º weather for the rest of the week. It is a strange season, for sure! Every time it hits even 45º, I get excited for the garden to start, partially because my seeds are growing so well in the basement and I'm antsy to transplant and the other reason is that I can already see my chives and garlic coming up so nicely! Both plants are already about 6-7 inches tall. This is my first year planting garlic and I can't wait for first harvest!

For me, spring equals garlic scapes and there is nothing better. The thought of scapes got me remembering a bread that I was addicted to last spring.  Mix garlic scapes with carbs and I am one happy girl!


Garlic Scapes and Chives

Now, if this weather would just cooperate so I can really see my plants grow, we're in business. Until then, I think I'll be making a loaf with fresh garlic and some chives that I have in the freezer from last season.

If you love scapes too, don't forget to try some Garlic Scapes Hummus or Garlic Scapes Pesto this season!


Garlic Scapes and Chive Flower Pull-Apart Bread

Garlic Scapes Pull-Apart Bread

Makes one loaf

Bread Ingredients:

1 c milk
1 egg
1/2 c mozzarella cheese
3 c bread flour
2 t organic cane sugar
1 1/2 r dried oregano
1 r salt
1 r active dry yeast


Garlic Butter Mixture:

1/4 c butter, melted
Diced garlic or chopped garlic scapes to taste (we like a LOT of garlic flavor!)
1/4 c chive flowers or sliced chives.

Optional: Parmesan cheese for topping.

Add bread ingredients to bread machine and set on dough cycle. If you don't have a bread machine, mix them all together and cover with a towel. Let dough rise until it doubles in size. Punch it down.

When finished, place dough on lightly floured surface and pat to 1/2+ inch thickness. Cut dough into about 32 pieces.

Mix garlic butter together.

Dip dough chunks into the garlic/scape mixture and place them butter-side down in a bread pan. Continue dipping and layering dough with butter side down until all dough is in the pan. If you would like, sprinkle the top with a little parmesan cheese.

Bake at 375º for 15-25 minutes or until it starts turning brown.

Invert onto a serving dish and serve warm (but it's still great cold).


Garlic Scapes and Chive Flower Pull-Apart Bread

Garlic Scapes and Chive Flower Pull-Apart Bread

Monday, November 23, 2015

Healthy Chai Spiced Muffins with Oat Crumble

A lot of people associate all things pumpkin with fall. However, my favorite fall (and winter) flavor is Chai. I simply can't resist chai-flavored anything!


Vegan and Healthy Chai Spiced Muffins with Oat Crumble

We had our first snowfall this weekend. It was a gorgeous one too! It stuck to the trees making it a beautiful winter wonderland. Savina woke up and went screaming through the house, "Get up everyone, there's snow on the ground." The boys quickly woke up. Seeing Simon's face as he laid his eyes on the snow was simply priceless. Being 16 months now, he doesn't remember the snow last year and didn't know what to think. He was running from window to window pointing at it and grunting. We ate the quickest breakfast in the history of our house and rushed to get our snow pants on to get outside.

Snow Kids Love Muffins

As we were outside, I began to think that it would've been nice to have some muffins ready on the weekend to really speed breakfast along. I usually make something special for Saturday's since it's our one day that we all get to sit and eat breakfast as a family ... Paul is long gone by the time the kids get up at 6:30 on weekdays! We still had pancakes today, but they were pretty simple pumpkin ones!

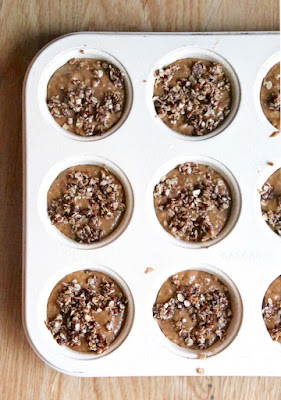
After that, muffins were stuck in my mind. We came inside. had some hot chocolate and the kids collected themselves a bit. A little later they were ready for round two. Paul took them out this time. I got to stay in and make some muffins! When they all came in, the house smelled of chai muffins and they were quickly enjoyed by all.

New tradition ... Chai Spiced Muffins on snow days!

A little side note ... yes, 16 is a strange number to make but I think it's quite a blessing. If you have to make a dozen muffins for work or an event, this gives you 4 leftover to enjoy yourself! Or, make your dozen in the muffin tin and fill a ramekin with the leftover to make one gigantic muffin (it takes another 10 minutes to bake) but if you don't like making two batches in your muffin tin, it's perfect. Plus, who doesn't love a gigantic muffin?!

**Vegan and Gluten Free options!


Vegan and Healthy Chai Spiced Muffins with Oat Crumble

Healthy Chai Spiced Muffins with Oat Crumble

Makes 16

Wet Ingredients

1/3 c coconut oil
1/3 c applesauce
1/4 c honey
1/4 c molasses
1/3 c coconut sugar (or brown sugar)
2 eggs
1 t vanilla
1 c almond milk or non-dairy alternative


Dry Ingredients

1 c oats
2 1/2 c flour
2 t cinnamon
1 t ginger
1 t cardamon
1/2 t nutmeg
1/2 t cloves
14 t black pepper
3/4 t salt
3/4 t baking soda


Topping

3 T butter
1/3 c coconut sugar (or brown sugar)
1/2 c oats
1/2 t cinnamon
1/4 t ginger
1/4 t cardamon

Vegan Option: Replace maple syrup for honey, 2 flax seed eggs and vegan butter
Gluten Free Option: Use your favorite GF All-Purpose Flour and make sure your oats are gluten free!

Preheat the oven for 375º.

In two separate bowls, mix together your dry ingredients and wet ingredients. Slowly begin mixing them together.

Prepare your muffin pan, and fill each cup 3/4 way full.


Mix together your topping by melting the butter and mixing in remaining ingredients. Top each muffin with a good helping of the crumble topping.

Bake for 17-17 minutes.


Friday, February 13, 2015

Roasted Red Pepper Corn and Flour Tortillas

Sometimes the things that I make aren't always the most practical, but at the end of the day I think 'homemade' overrides 'practical'! Homemade tortillas are one of those situation recipes. They are really cheap to buy, but they are even cheaper to make. Once you try fresh, homemade tortillas you will throw practical out the window and start mixing some dough. I can even one up that and say, once you try fresh, homemade roasted red pepper tortillas you will run to your kitchen and start cooking!

I am not a huge fan of just plain corn tortillas. They almost always break when you are using them, except for a few select brands, but they are expensive. I usually choose flour tortillas even though I like the extra flavor that corn tortillas have to offer. This is why I make mine half and half. I get the best of both worlds. They turned out just how I hoped. They fold nicely, but they have that great gritty corn flavor.

Roasted Red Pepper Corn and Flour Tortillas

Seriously, don't be intimidated by making your own tortillas. This does sound like a big task, but these surprisingly don't take that long to make and the outcome is SO worth it.

I'm not big into Valentine's Day, but I think I will be making these again tomorrow to get a little more red in our meal!


Roasted Red Pepper Corn Tortillas

Makes 10-12 tortillas

2 red peppers
2 cloves garlic
1 1/4 c AP flour
1 1/4 c cornmeal, fine ground
1/4 c coconut oil
3 T water
1 1/2 t baking powder
1 t salt


First, roast your red peppers and garlic on the same pan. Click here for instructions.

How to Roast Red Peppers

Once your peppers have cooled and you've removed the skins, add all ingredients to your food processor and mix until they are well incorporated. Add a little more water should you need. The dough should like clumpy, but when easily able to form together when you  push it together.

Roasted Red Pepper Corn and Flour Tortillas

Next, divide it into 10-12 balls. Cover them with a wet towel and let them sit for 10 minutes.

Roasted Red Pepper Corn and Flour Tortillas

Next, begin rolling them out. Roll them out on a floured surface nice and thin ... as thin as you can go without breaking them.

Roasted Red Pepper Corn and Flour Tortillas

Heat a frying pan with a touch of oil in it. Lay your tortillas in it and fry it for 2-3 minutes on both sides or until it starts to brown. As one tortillas is frying, I roll out my next one. This way, they don't dry out.

Serve them immediately. If you plan on saving them, let them cool under a towel then pack them in a sealed bag until you are ready to use. I only keep them for a day or two ... they wouldn't survive in my house longer than that anyways!

I have heard of people freezing them before, but I haven't tried that yet. If you do, let me know how it goes!

Roasted Red Pepper Corn and Flour Tortillas

Wednesday, January 7, 2015

Sweet Potato Cornbread Pancakes

I have had two good cornbreads my whole life. I probably have had my chance at many more, but I usually don't give them a try. When I have given them a try, they are usually really dry and they make me want to slam a big glass of water! Anyone else have that same feeling?

A couple weeks ago we went to the restaurant that has the cornbread that I really like. After getting home it was on my mind so I decided to make some cornbread of my own. I was already planning on making sweet potato pancakes so I decided to try to combine the two and have something new. I don't know what it is about sweet potatoes, but it makes me gravitate toward Mexican spices. I love it with cumin and coriander!

I am sad to say that when they were all done, they were super blah ... another failed cornbread! However, I loved the consistency of the pancake. It was almost like a burger. I wasn't giving up that easily. I will make a good cornbread! I made them again and pumped up the spices. Now, we love them. They are pretty hearty, so I have been serving them with a black bean quesadilla. It makes for an easy meal that the whole family enjoys.


Sweet Potato Cornbread Pancakes

I was about to make them, yet again, last night and I realized that I was out of corn in my freezer. I replaced the corn with edamame and it was still yummy and a little more colorful! I am still in shock a little though. I thought I processed enough corn on the cob this past fall to get me through the winter and here I am, in the beginning of January without any corn in the freezer!

Signed,
Bad Planner

Sweet Potato Cornbread Pancakes

Makes 6

1 sweet potato, diced (about 2 cups)
dash of salt, pepper and oil
3/4 c corn
1/2 c cornmeal
1/2 c almond meal (or AP flour)
1/2 c milk
1 egg
2 scallions, chopped
1/4 c cilantro, chopped
juice from 1/2 lime
1 1/2 T baking powder
1/2 t chili powder
1/2 t coriander
1/2 t cumin
1/2 t salt
1/2 t pepper


Preheat the oven for 375º.

Mix your diced sweet potatoes with a little salt, pepper and oil. Lay out on a pan and bake for 15-18 minutes or until nice and tender.

Meanwhile, in a mixing bowl, add the rest of your ingredients. Once sweet potatoes are done, add those to the mix. Using a potato masher, mix everything together.


Sweet Potato Cornbread Pancakes

Sweet Potato Cornbread Pancakes

Sweet Potato Cornbread Pancakes

Form into 6 patties. Heat up some coconut or canola oil in a pan and fry your patties on medium heat for about 4 minutes per side.

I love them plain, but they were also good dipped in a little sour cream or cilantro pesto!

Sweet Potato Cornbread Pancakes

Saturday, August 2, 2014

Glazed Lemon Zucchini Bread

The day that Simon was born we went out to my aunt and uncles farm and had a beautiful day picking vegetables. Their garden is bigger than the footprint of our house and it is just breathtaking. The kids loved running through the corn, picking potatoes and best of all eating food right from the plants! This wasn't a huge surprise considering how much food they pick from my garden ... ready or not, they are picking it!


It was amazing to be out there spending time with my kids. It brought back a lot of memories when I used to spend time out there at their age and probably doing the same thing. Picking vegetables that I should and should not be picking! I think Simon sensed some great things too and that's why he decided to finally make an appearance. He couldn't miss any more summer or opportunities out at the farm!

Now that we're happy and at home with the family, it's back to some kitchen time. We have great little zucchini from the the farm for grilling and cooking with but luckily some bigger stuff from our CSA and the farmer's market too. I like using the great big zucchini for baking.


Since it's so good to be home with the family, I needed some bright summery bread to go with my bright summery attitude! I usually like a zucchini chocolate bread but I thought lemon was much more in order than chocolate ... sorry all you chocolate lovers but I promise this recipe will not disappoint! I love the smell of fresh bakery filling the house ... I love hearing the running of feet tear through the house ... I love watching my family grow.

Can I just say how good it is to be home?


Glazed Lemon Zucchini Bread

Makes 1 loaf

1 c flour
1 c almond meal*
2 t baking powder
1/2 t salt
2 eggs
1 c zucchini, shredded and squeezed
3/4 c sugar
1/2 c applesauce
1/2 c canned coconut milk
2 T lemon juice


Glaze:
2 T honey
2 T lemon juice


*If you don't want to use almond meal, use 2 c flour total.

Preheat the oven for 350º.

In a bowl, mix together together your dry ingredients. In another bowl, mix together your wet ingredients. Slowly fold in your dry ingredients.

Pour into a sprayed 9x5 in loaf pan. Bake for 45-50 minutes or until you can stick a knife or toothpick in and it comes out clean.

Lemon Zucchini Bread

Mix your glaze ingredients together. When the bread is still warm, pour the glaze over the bread.


Wednesday, June 4, 2014

Pumpkin Morning Glory Muffins

Morning Glory MuffinsI'm not a coffee drinker but I really like tea. Every now and again on weekends, Paul and I take the kids out for a morning snack and we get a cup of tea at a local coffee shop. When there are fresh Morning Glory Muffins, I just can't resist them. I started making my own a few years back so I can enjoy them whenever I wanted. Also, I love having muffins around that are filled with veggies for the kids!

Recently, I had some extra pumpkin puree in the fridge from another recipe. I figured I would add it to my pancake mixture when I was going to make pancakes, but the idea of a Morning Glory Muffin quickly came into my head and I decided to transform the classic recipe. It's a great little twist and I loved having yet one more veggie in the muffin!


Pumpkin Morning Glory Muffins

Makes 12 muffins

1 c AP Flour, (gluten free or regular)
1 c oats
2 t baking powder
2 t cinnamon
1/2 t salt

2 eggs
1 c pumpkin puree
1/3 c honey
1/4 c coconut oil
2 c carrots, shredded
1/2 c coconut, shredded
1/2 c raisins

In a bowl mix together your flour, oats, baking powder, cinnamon and salt.

In your mixing bowl, mix together eggs, pumpkin, honey and coconut oil until everything is well incorporated. Slowly, add in your flour mixture. Then add in your carrots, 2 T coconut and raisins.

In a sprayed and floured muffin pan, divide your mixture. It should fill each muffin tin about 3/4 full. Top with your remaining 2 T coconut.

Bake at 350° for 30-35 minutes or until you can stick a toothpick in them and it comes out clean. Let them sit in the pan for 10 minutes before transferring them to a wire rack.


Morning Glory Muffins

Monday, April 28, 2014

Sun-Dried Tomato Pesto Focaccia


It was one of those days that I just needed some fresh bakery in the house but had no desire for sugar. I feel like I go on highs and lows with bread. I make it all the time for two weeks straight, make vows to only have homemade bread and then I’m at the grocery store and I just want a nice baguette and I don’t make another loaf for 2 months! I’m at a low. It’s been awhile since I made bread so I was really craving some.

I broke open my trusty 'Breaking Bread with Father Dominic' recipe book. If you’re ever looking for a bread cookbook, this priest knows his bread!  I used his Tomato Basil Focaccia recipe as a guide but didn’t want (or have) tomato juice or fresh basil so I made some adjustments. It worked out to my benefit. The loaf was gone by the next morning. Hmmm … maybe that’s not to my benefit!

Sun-Dried Tomato Pesto Focaccia
I didn't get a picture of the whole bread ... The kids dove in right when it came out of the oven!
Sun-dried Tomato Pesto Focaccia
Makes 1 loaf

Dough Ingredients
2 c AP flour
1/2 c almond meal
1 c water
1 1/2 t quick start yeast
2 T sun-dried tomatoes in oil
1 T oil
1 t salt
1 oz pesto

Toppings:
1 T olive oil
1 T italian seasoning or 1/4 fresh herbs
1 T parmesan cheese (optional)

Add dough ingredients to bread machine pan in order the manufacturer suggests. Select the dough/manual cycle.

When cycle is complete, remove dough from machine to a lightly floured surface. Form dough into a 12 inch round. Place on ungreased pizza stone … use a baking sheet if you don’t have one. Also, if you don’t have a pizza stone, get one!

Brush 1 T olive oil on top of the loaf. Let rise, uncovered for about 30 minutes or until almost doubled in size. Poke dough randomly making little dimples. Top the dough with herbs and sprinkle with a little salt.

Preheat oven 400º.

Bake for 20 minutes or until done. 

Thursday, April 17, 2014

Spicy Sour Cream Biscuits

My cousin and her husband recently went to New Orleans. This is one of those places that I’ve always wanted to go but really have no desire to make it happen. I think the main reason I want to go is because of the food culture that is so prevalent there. New Orleans seems to have its own unique cuisine because of its diverse culture. That’s pretty amazing.

After hearing a bit about their trip, my taste buds were watering and I needed some biscuits. As usual, I didn’t have the ingredients for my normal recipe so I got to try something new and that is the birth of my spicy biscuits. Of course, my love for cheese and sour cream couldn’t be left out of these.

They turned out great. They were gooey and soft with just a little tang from the Tabasco in them.


Spicy Sour Cream Biscuits

Spicy Sour Cream Biscuits

Makes 14 mini biscuits

2 c AP flour
1 c butter, at room temperature
1 c sour cream, I use tofutti
4 oz shredded sharp cheddar
2 t tabasco (sriracha works great too)


Preheat oven for 400º.

Mix butter and flour together until smooth. Add sour cream, cheese and Tabasco.

Once everything is thoroughly mixed, fill mini muffin pan ¾ full with batter. Bake 12-14 minutes or until golden. Mine were a little gooey in the middle but I didn’t want them too stiff and since there was no egg, I pulled them!

If you want, melt 3 more tablespoons of butter and mix in a teaspoon of dill and a dash of salt and spread that over the finished biscuits for an extra flavor burst!

Spicy Sour Cream Biscuits

Wednesday, April 16, 2014

Gluten Free Peanut Butter Kiss Muffins


Gabe has been asking for muffins for at least a week now. I’ve been putting it off for too long but now, it’s muffin day. However, I really needed to get to the store for groceries but Paul had the car. The kids lucked out, they didn’t get the normal fruit and vegetable filled muffins I usually make. I had just made peanut butter yesterday so I at least new what direction I could take the muffins. I saw 11 chocolate kisses in the pantry that needed a home before I continued to eat them all by myself during the kids' nap time.

The muffins were a little gooey, I don’t know if that’s because of my guessing game with the gluten free flour or if they needed a few more minutes in the oven but the kids and I liked them just the way they were. I even offered it up and ate the one muffin without the kiss in it since I only had 11 kisses. Ah, what us mom’s sacrifice.

Peanut Butter Kiss Muffins

Gluten Free Peanut Butter Kiss Muffins
makes 12 muffins

Wet Ingredients
2 bananas
¼ c agave nectar
Peanut Butter Kiss Muffins¼ c brown sugar
1 egg
1/3 c almond milk (or other milk alternative)
½ c peanut butter
½ c greek yogurt, I used vanilla flavored

Dry Ingredients
1 c coconut flour
½ c almond meal
¼ c oats
½ t xanthan gum
1 t baking powder
1 t baking soda
¼ t salt
1 t cinnamon

12 chocolate kisses

Preheat 375º.

Mix banana, agave nectar, sugar and egg until smooth. Add in almond milk, peanut butter and yogurt.

In a separate bowl mix all dry ingredients. Add them to the wet ingredients little by little.

Spray and flour your muffin pan. Fill each muffin ½ way full. Add your Hershey kiss. Top with mixture so each muffin is ¾ full.

Bake 14 minutes. Mine were a little doughy but they were very good. I may try a few more minutes next time.


Thin Crust Pizza Crust

Pizza crust has been my nemesis for many years now. I know what kind of crust I like, flaky and crispy crust but it can be a little doughy around the edges. I want my dough to be crisp in the center too. There's nothing worse than a soggy first bite of pizza crust. I have tried countless recipes adjusting little things here and there. I have been using this recipe for about two years adjusting tiny bits and I finally have it to where I like it. I hope you like it too.

Thin Crust Pizza Crust

Thin Crust Pizza Crust

Makes 2 crusts

2 1/2 c flour
1 c warm water
1 T olive oil
1 1/2 t active dry yeast
1 1/2 t sugar
1 t salt


Mix yeast and warm water for at least 5 minutes or until yeast has dissolved and has started to foam at the top.

In a stand mixer with dough hook attached, add the yeasty water, oil, salt, and sugar. Add flour a cup at a time. Mix on low speed until all of the flour and water have mixed and a stiff dough ball forms. Stop mixing as soon as the dough ball forms.

Place the dough ball into a large bowl and cover with a towel. Drizzle a little olive oil onto the dough. Keep in a cool, dry place. Let the dough rise for 6-8 hours before using. Punch it down every hour and a half.


Thin Pizza Crust

I usually make a double or triple batch. I divide the dough into 10-12 oz. balls, wrap them in plastic wrap and freeze them until I need them. When you are ready to use them, thaw them in the refrigerator overnight.  


Thin Pizza Crust

Thin Pizza Crust

When you're ready to bake ...

Preheat your pizza stone in the oven at 425º.

Roll out dough to be about 10-12 inches in diameter. Once oven is preheated, take out the stone and place dough on the stone. Add your toppings. Bake for 20-24 minutes or until outsides start to brown and cheese has melted.


Thin Pizza Crust - Made